> ## Documentation Index
> Fetch the complete documentation index at: https://docs.cloudglue.dev/llms.txt
> Use this file to discover all available pages before exploring further.
# Files
> Understanding how files work in Cloudglue
Files make up the foundation of operating with Cloudglue. Files represent a video or audio file that you want to operate on.
Once you upload a file, you can use it anywhere in the Cloudglue platform, whether it may be for [on-demand operations like describing](/core-concepts/describe) or for use in [collections like entities collections](/core-concepts/entity-collection).
We do not use your files for any purpose other than to provide you with the service you signed up for.
## Working with Files
### Uploading Files
#### Web App
The Cloudglue web app allows you to upload files by dragging and dropping them into the web app or by selecting them from your file system.
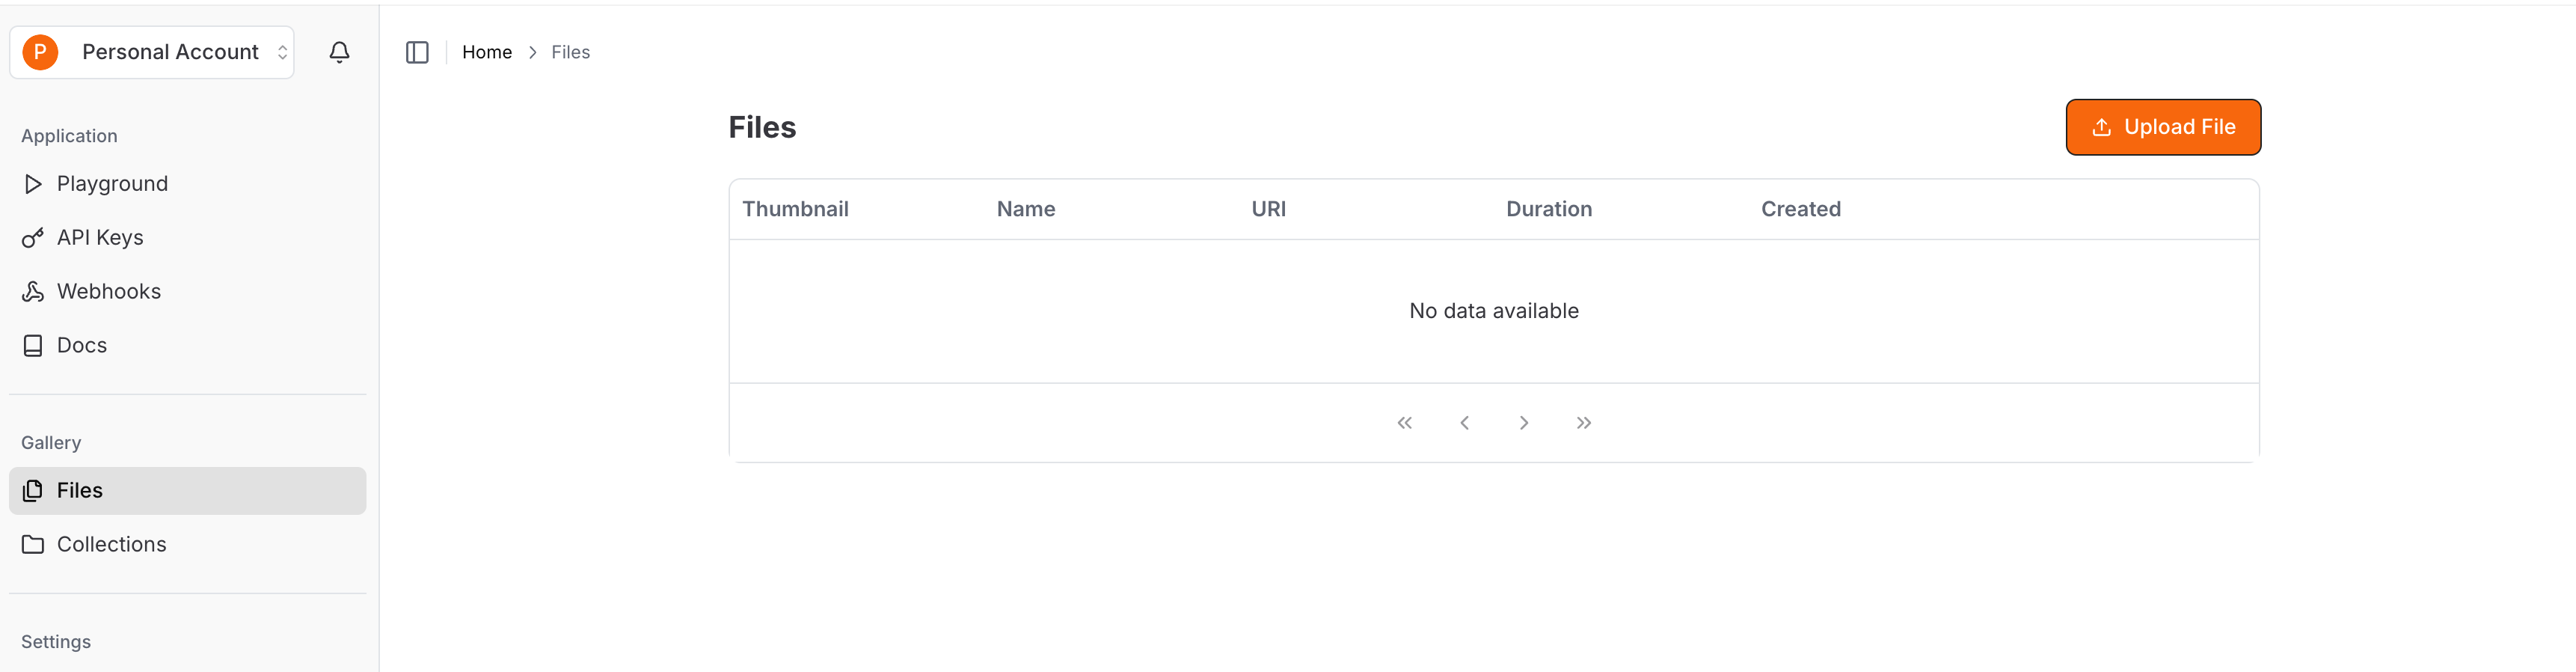
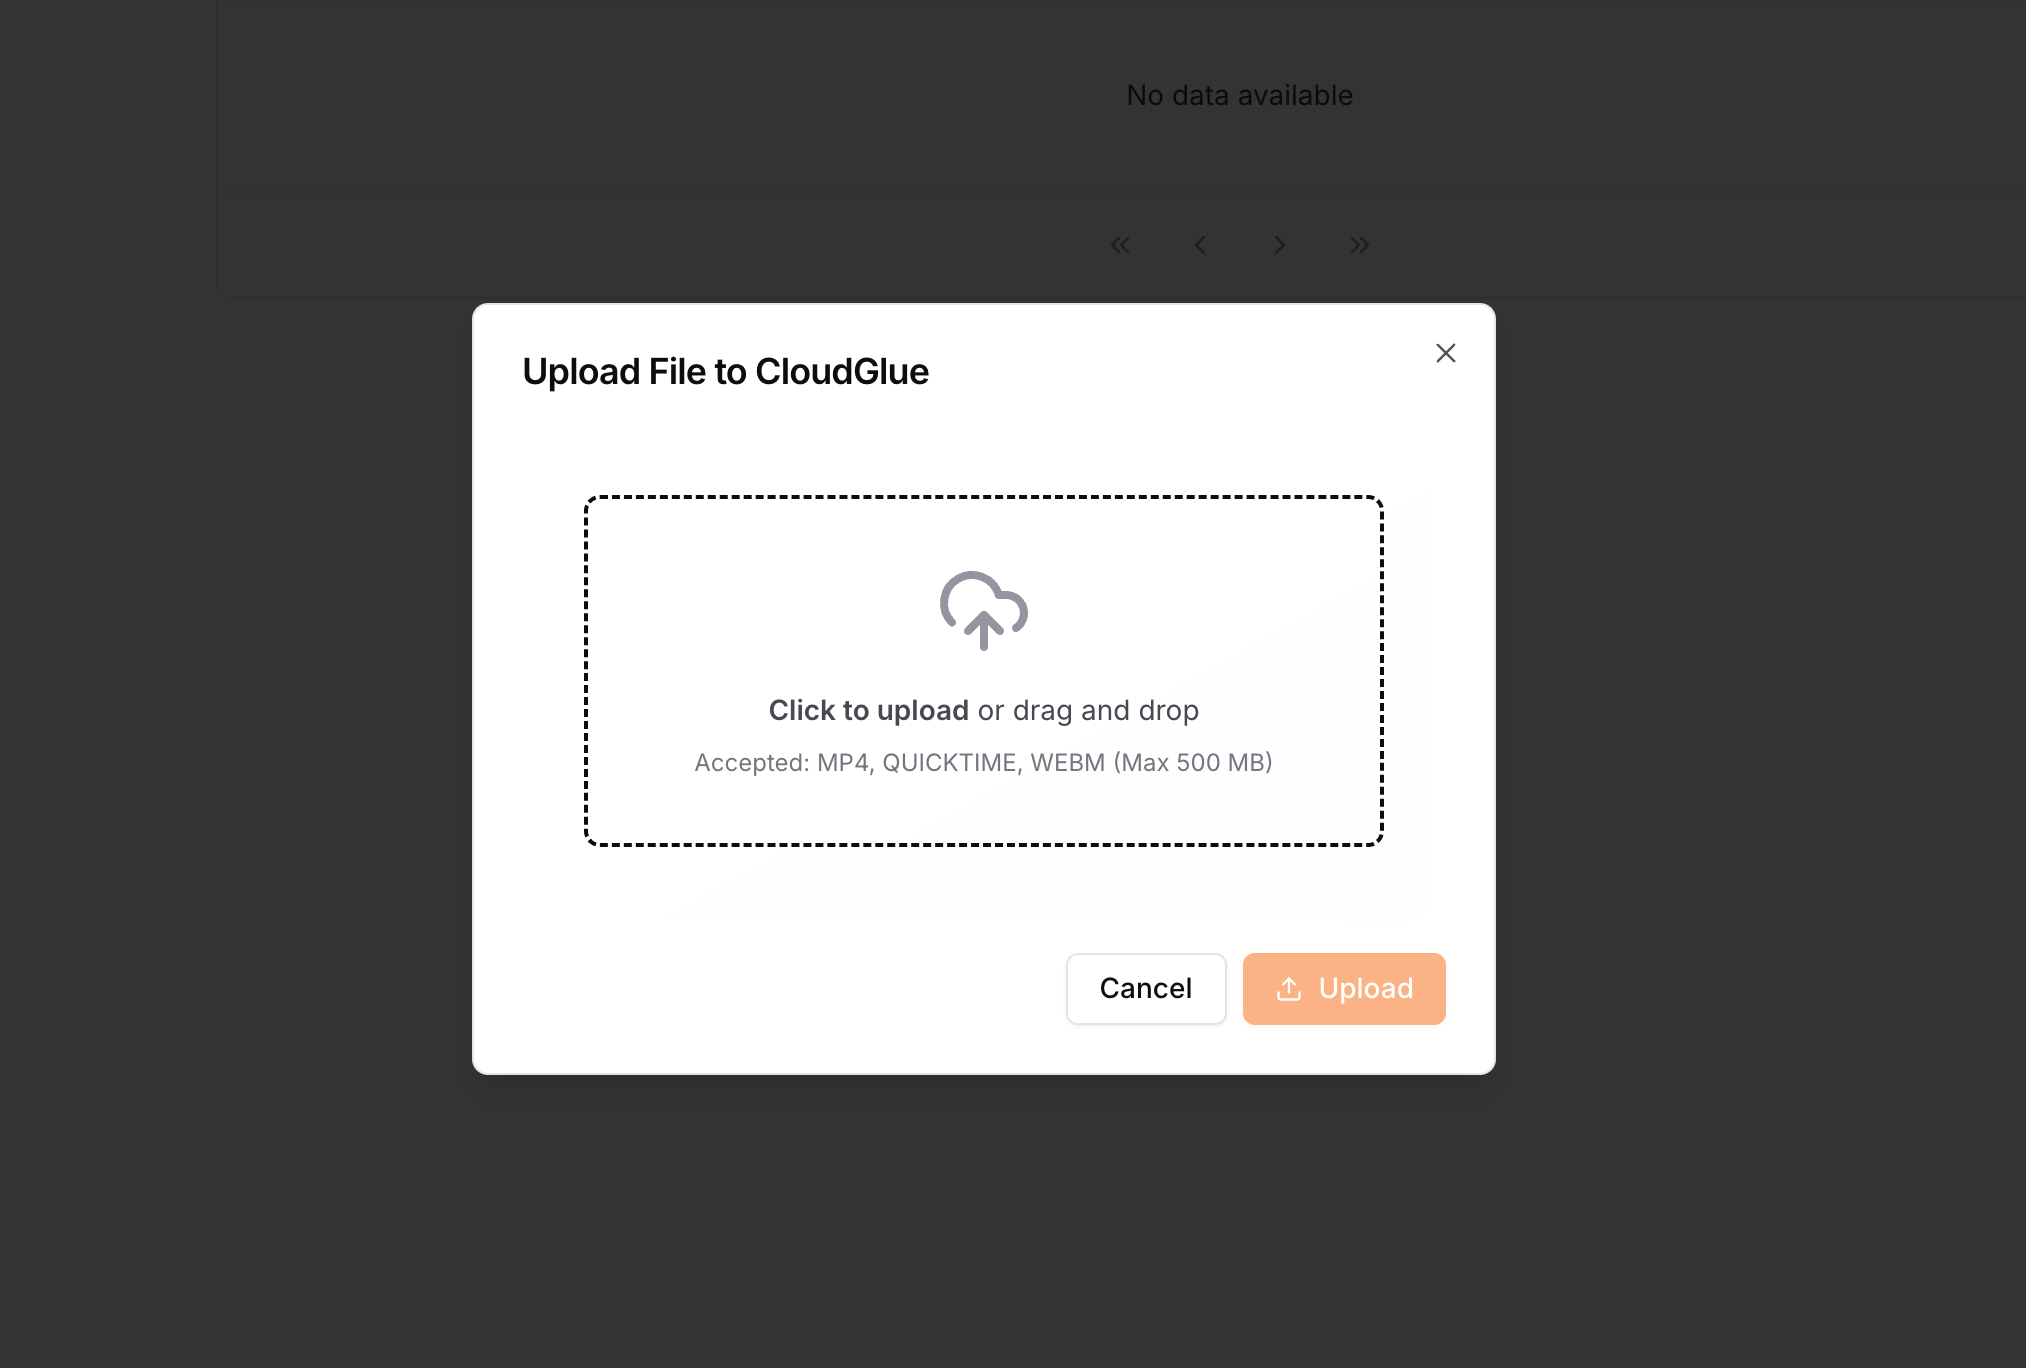 **Note**: Local uploads are best for files under 250 MB. For larger files, use a [data connector](/data-connectors/overview).
#### API
You can also upload files via our [Files API](/api-reference/endpoint/files/post).
##### Example
```bash theme={null}
curl --request POST \
--url https://api.cloudglue.dev/v1/files \
--header 'Authorization: Bearer cg-YOUR_API_KEY' \
--header 'Content-Type: multipart/form-data' \
--form 'metadata={}' \
--form file=@file.mp4
```
#### SDKs
You can also use our [SDKs](/sdks) to upload files to Cloudglue.
##### Example
```typescript theme={null}
import { Cloudglue } from '@cloudglue/cloudglue-js';
const cloudGlue = new Cloudglue({
apiKey: 'cg-YOUR_API_KEY',
});
const file = await cloudGlue.files.uploadFile({
file: new File([...videoData], 'video.mp4'),
metadata: {},
});
console.log(file);
```
```python theme={null}
import cloudglue
file = cloudglue.files.upload(file_data, metadata={})
```
### File Metadata
When uploading a file, you can pass in metadata. This metadata is for your own reference. You can use this to store your own custom data, such as identifiers or names from your own system.
When you retrieve a file, the metadata is included in the response.
##### Example
```typescript theme={null}
const file = await cloudGlue.files.uploadFile({
file: new File([...videoData], 'video.mp4'),
metadata: {
my_own_id: '12345687890',
type: 'Sales Footage',
},
});
const file = await cloudGlue.files.getFile(file.id);
console.log(file);
```
```python theme={null}
file = cloudglue.files.upload(file_data, metadata={
"my_own_id": "12345687890",
"type": "Sales Footage"
})
file = cloudglue.files.get(file.id)
print(file)
```
```bash theme={null}
curl --request POST \
--url https://api.cloudglue.dev/v1/files \
--header 'Authorization: Bearer cg-YOUR_API_KEY' \
--header 'Content-Type: multipart/form-data' \
--form 'metadata={"my_own_id": "12345687890", "type": "Sales Footage"}'
curl --request GET \
--url https://api.cloudglue.dev/v1/files/file_1234567890 \
--header 'Authorization: Bearer cg-YOUR_API_KEY'
```
##### Response
```json theme={null}
{
...,
"metadata": {
"my_own_id": "12345687890",
"type": "Sales Footage"
}
}
```
### File Status
Cloudglue is inherently asynchronous.
We use the `file status` to indicate the current status of the file.
The possible values are:
* `pending` - The file is pending and has not been processed yet.
* `processing` - The file is being processed.
* `completed` - The file has been processed successfully.
* `failed` - The file failed to process.
You can check the status of a file by calling the `getFile` method.
##### Example
```typescript theme={null}
const file = await cloudGlue.files.getFile(file.id);
console.log(file.status);
```
```python theme={null}
file = cloudglue.files.get(file_id)
print(file.status)
```
```bash theme={null}
curl --request GET \
--url https://api.cloudglue.dev/v1/files/file_1234567890 \
--header 'Authorization: Bearer cg-YOUR_API_KEY'
```
##### Response
```typescript theme={null}
'pending' | 'processing' | 'completed' | 'failed';
```
##### Webhooks
To listen for file status updates asynchronously, you can use our [webhooks](/getting-started/webhooks). You can provide an endpoint to listen to the following file events:
* `file.job.processing` - When a file is being processed.
* `file.job.completed` - When a file has been processed successfully.
* `file.job.failed` - When a file has failed to process.
* `file.job.deleted` - When a file is deleted.
## File Limits & Requirements
### Size Limits
* **Maximum file size**: 2 GB per file
* **Local upload limit**: 250 MB for uploads via web app or files API
* Larger local uploads may fail or lead to slow processing times
* For files larger than 250 MB, use a data connector such as AWS S3
### Duration Limits
* **Minimum duration**: 2 seconds
* **Maximum duration**: 2 hours
* Files longer than 2 hours must be split into multiple parts before uploading
* Each part must still respect the 2 GB size limit
### Upload Limits
We do not charge you for the storage of your files. However, we do have some limits in place to prevent abuse. To see the limits, please see the [Rate Limits](/getting-started/rate-limits#file-uploads) page.
### Higher Limits
If you need larger file sizes or expect to upload many large files, [contact us](mailto:support@cloudglue.dev) to discuss custom limits.
## Supported File Types
Cloudglue supports the following file types:
### Video Files
* `video/mp4`
* `video/quicktime`
* `video/avi`
* `video/webm`
* `application/octet-stream`
### Audio Files
* `audio/mpeg` (MP3)
* `audio/mp4` (M4A, AAC)
* `audio/wav`
* `audio/x-wav`
* `audio/flac`
* `audio/ogg`
* `audio/webm`
### Image Files
* `image/jpeg`
* `image/png`
* `image/webp`
* `image/heic`
* `image/heif`
Images are processed at the **file level only** (no segmentation). On-Demand
[Describe](/core-concepts/describe) and [Extract](/core-concepts/extract) run on
the whole image and are billed at a flat **1 credit** per operation. Speech and
audio-description options do not apply to images.
Don't see your file type? [Contact us](mailto:support@cloudglue.dev) about it.
## Audio File Processing
Audio files are processed using the transcript by default for speech-based analysis. For comprehensive audio analysis including music, sound effects, and ambient sounds, you can enable `enable_audio_description` in your describe configuration.
* **Transcript-only mode** (default): Uses transcript for title/summary generation. Best for podcasts, interviews, and speech-heavy content. Faster and more cost-effective.
* **Audio description mode** (`enable_audio_description: true`): Uses Gemini for comprehensive audio analysis including speech, music, sound effects, and ambient sounds. Best for rich audio content with significant non-speech audio.
Audio files cannot be added to face-analysis collections since facial analysis
requires visual content.
## Optimal File Formatting
To ensure fast processing and reliable playback, uploaded videos should follow these industry-standard encoding parameters. We will start rejecting non-standard inputs in the future:
| Parameter | Recommended Value | Notes |
| ------------------ | ---------------------- | ---------------------------------------------------------------------------------------------------------------- |
| **Container** | MP4 (.mp4) | Use MP4 container with moov atom at the start (use `-movflags +faststart` option when encoding) |
| **Video Codec** | H.264 (AVC) | H.264 is widely supported. Other codecs (HEVC/ProRes/etc.) may be transcoded and could be rejected in the future |
| **Resolution** | ≤1080p/2K (≤2048×2048) | Higher resolutions increase processing time and may exceed file-size limits |
| **Audio Codec** | AAC | Non-AAC audio will be transcoded and may be rejected |
| **Audio Channels** | Mono or stereo | Multi-channel audio (5.1, 7.1, etc.) will be down-mixed |
### Transcoding with ffmpeg to ideal video format
Use ffmpeg to convert your source video into a supported format:
```bash theme={null}
ffmpeg -i input_video.ext \
-c:v libx264 \
-vf "scale=w=min(iw\,1920):h=-2" \
-c:a aac -b:a 192k -ac 2 \
-movflags +faststart \
output.mp4
```
This command:
* Uses H.264 video codec
* Limits width to ≤1920px while maintaining aspect ratio
* Encodes stereo AAC audio at 192k bitrate
* Puts MP4 metadata at start for faster streaming
### Checking Video Specifications
Use this script to check if your video meets the recommended specifications:
```bash theme={null}
#!/bin/bash
# Usage: ./check-video.sh
FILE="$1"
# Extract video properties: codec, width, height
read -r vcodec width height <<<$(ffprobe -v error -select_streams v:0 \
-show_entries stream=codec_name,width,height \
-of default=noprint_wrappers=1:nokey=1 "$FILE")
# Extract audio properties: codec, channels
read -r acodec channels <<<$(ffprobe -v error -select_streams a:0 \
-show_entries stream=codec_name,channels \
-of default=noprint_wrappers=1:nokey=1 "$FILE")
# Flag if any property falls outside the recommended specs
needs_transcode=0
if [[ "$vcodec" != "h264" ]] || [[ "$width" -gt 2048 ]] || [[ "$height" -gt 2048 ]]; then
needs_transcode=1
fi
if [[ "$acodec" != "aac" ]] || [[ "$channels" -gt 2 ]]; then
needs_transcode=1
fi
if [[ $needs_transcode -eq 1 ]]; then
echo "This file does not meet the recommended specs and should be transcoded."
else
echo "This file meets the recommended specs."
fi
```
### Splitting Large Videos
If your video is longer than 2 hours or larger than 2 GB, split it into compliant chunks:
```bash theme={null}
# Split into 90-minute segments without re-encoding
ffmpeg -i long_video.mp4 -map 0:v:0 -map 0:a:0? -dn -c copy -f segment \
-segment_time 01:30:00 -reset_timestamps 1 \
part_%03d.mp4
```
To check duration and size before splitting:
```bash theme={null}
ffprobe -i input.mp4 -hide_banner -v error \
-show_entries format=duration,size \
-of default=noprint_wrappers=1:nokey=1
```
## Best Practices Summary
* **For quick experiments**: Use local uploads for files under 250 MB
* **For larger files**: Set up a data connector such as AWS S3
* **Before uploading**: Ensure files are 2 seconds to 2 hours duration and ≤2 GB
* **For optimal performance**: Use MP4 with H.264 video, AAC audio, ≤1080p resolution
* **For long videos**: Split into chunks using ffmpeg and track parts with metadata
* **Always check**: Use ffprobe to verify file specifications before upload
For questions about custom limits or larger file requirements, [contact our support team](mailto:support@cloudglue.dev).
**Note**: Local uploads are best for files under 250 MB. For larger files, use a [data connector](/data-connectors/overview).
#### API
You can also upload files via our [Files API](/api-reference/endpoint/files/post).
##### Example
```bash theme={null}
curl --request POST \
--url https://api.cloudglue.dev/v1/files \
--header 'Authorization: Bearer cg-YOUR_API_KEY' \
--header 'Content-Type: multipart/form-data' \
--form 'metadata={}' \
--form file=@file.mp4
```
#### SDKs
You can also use our [SDKs](/sdks) to upload files to Cloudglue.
##### Example
```typescript theme={null}
import { Cloudglue } from '@cloudglue/cloudglue-js';
const cloudGlue = new Cloudglue({
apiKey: 'cg-YOUR_API_KEY',
});
const file = await cloudGlue.files.uploadFile({
file: new File([...videoData], 'video.mp4'),
metadata: {},
});
console.log(file);
```
```python theme={null}
import cloudglue
file = cloudglue.files.upload(file_data, metadata={})
```
### File Metadata
When uploading a file, you can pass in metadata. This metadata is for your own reference. You can use this to store your own custom data, such as identifiers or names from your own system.
When you retrieve a file, the metadata is included in the response.
##### Example
```typescript theme={null}
const file = await cloudGlue.files.uploadFile({
file: new File([...videoData], 'video.mp4'),
metadata: {
my_own_id: '12345687890',
type: 'Sales Footage',
},
});
const file = await cloudGlue.files.getFile(file.id);
console.log(file);
```
```python theme={null}
file = cloudglue.files.upload(file_data, metadata={
"my_own_id": "12345687890",
"type": "Sales Footage"
})
file = cloudglue.files.get(file.id)
print(file)
```
```bash theme={null}
curl --request POST \
--url https://api.cloudglue.dev/v1/files \
--header 'Authorization: Bearer cg-YOUR_API_KEY' \
--header 'Content-Type: multipart/form-data' \
--form 'metadata={"my_own_id": "12345687890", "type": "Sales Footage"}'
curl --request GET \
--url https://api.cloudglue.dev/v1/files/file_1234567890 \
--header 'Authorization: Bearer cg-YOUR_API_KEY'
```
##### Response
```json theme={null}
{
...,
"metadata": {
"my_own_id": "12345687890",
"type": "Sales Footage"
}
}
```
### File Status
Cloudglue is inherently asynchronous.
We use the `file status` to indicate the current status of the file.
The possible values are:
* `pending` - The file is pending and has not been processed yet.
* `processing` - The file is being processed.
* `completed` - The file has been processed successfully.
* `failed` - The file failed to process.
You can check the status of a file by calling the `getFile` method.
##### Example
```typescript theme={null}
const file = await cloudGlue.files.getFile(file.id);
console.log(file.status);
```
```python theme={null}
file = cloudglue.files.get(file_id)
print(file.status)
```
```bash theme={null}
curl --request GET \
--url https://api.cloudglue.dev/v1/files/file_1234567890 \
--header 'Authorization: Bearer cg-YOUR_API_KEY'
```
##### Response
```typescript theme={null}
'pending' | 'processing' | 'completed' | 'failed';
```
##### Webhooks
To listen for file status updates asynchronously, you can use our [webhooks](/getting-started/webhooks). You can provide an endpoint to listen to the following file events:
* `file.job.processing` - When a file is being processed.
* `file.job.completed` - When a file has been processed successfully.
* `file.job.failed` - When a file has failed to process.
* `file.job.deleted` - When a file is deleted.
## File Limits & Requirements
### Size Limits
* **Maximum file size**: 2 GB per file
* **Local upload limit**: 250 MB for uploads via web app or files API
* Larger local uploads may fail or lead to slow processing times
* For files larger than 250 MB, use a data connector such as AWS S3
### Duration Limits
* **Minimum duration**: 2 seconds
* **Maximum duration**: 2 hours
* Files longer than 2 hours must be split into multiple parts before uploading
* Each part must still respect the 2 GB size limit
### Upload Limits
We do not charge you for the storage of your files. However, we do have some limits in place to prevent abuse. To see the limits, please see the [Rate Limits](/getting-started/rate-limits#file-uploads) page.
### Higher Limits
If you need larger file sizes or expect to upload many large files, [contact us](mailto:support@cloudglue.dev) to discuss custom limits.
## Supported File Types
Cloudglue supports the following file types:
### Video Files
* `video/mp4`
* `video/quicktime`
* `video/avi`
* `video/webm`
* `application/octet-stream`
### Audio Files
* `audio/mpeg` (MP3)
* `audio/mp4` (M4A, AAC)
* `audio/wav`
* `audio/x-wav`
* `audio/flac`
* `audio/ogg`
* `audio/webm`
### Image Files
* `image/jpeg`
* `image/png`
* `image/webp`
* `image/heic`
* `image/heif`
Images are processed at the **file level only** (no segmentation). On-Demand
[Describe](/core-concepts/describe) and [Extract](/core-concepts/extract) run on
the whole image and are billed at a flat **1 credit** per operation. Speech and
audio-description options do not apply to images.
Don't see your file type? [Contact us](mailto:support@cloudglue.dev) about it.
## Audio File Processing
Audio files are processed using the transcript by default for speech-based analysis. For comprehensive audio analysis including music, sound effects, and ambient sounds, you can enable `enable_audio_description` in your describe configuration.
* **Transcript-only mode** (default): Uses transcript for title/summary generation. Best for podcasts, interviews, and speech-heavy content. Faster and more cost-effective.
* **Audio description mode** (`enable_audio_description: true`): Uses Gemini for comprehensive audio analysis including speech, music, sound effects, and ambient sounds. Best for rich audio content with significant non-speech audio.
Audio files cannot be added to face-analysis collections since facial analysis
requires visual content.
## Optimal File Formatting
To ensure fast processing and reliable playback, uploaded videos should follow these industry-standard encoding parameters. We will start rejecting non-standard inputs in the future:
| Parameter | Recommended Value | Notes |
| ------------------ | ---------------------- | ---------------------------------------------------------------------------------------------------------------- |
| **Container** | MP4 (.mp4) | Use MP4 container with moov atom at the start (use `-movflags +faststart` option when encoding) |
| **Video Codec** | H.264 (AVC) | H.264 is widely supported. Other codecs (HEVC/ProRes/etc.) may be transcoded and could be rejected in the future |
| **Resolution** | ≤1080p/2K (≤2048×2048) | Higher resolutions increase processing time and may exceed file-size limits |
| **Audio Codec** | AAC | Non-AAC audio will be transcoded and may be rejected |
| **Audio Channels** | Mono or stereo | Multi-channel audio (5.1, 7.1, etc.) will be down-mixed |
### Transcoding with ffmpeg to ideal video format
Use ffmpeg to convert your source video into a supported format:
```bash theme={null}
ffmpeg -i input_video.ext \
-c:v libx264 \
-vf "scale=w=min(iw\,1920):h=-2" \
-c:a aac -b:a 192k -ac 2 \
-movflags +faststart \
output.mp4
```
This command:
* Uses H.264 video codec
* Limits width to ≤1920px while maintaining aspect ratio
* Encodes stereo AAC audio at 192k bitrate
* Puts MP4 metadata at start for faster streaming
### Checking Video Specifications
Use this script to check if your video meets the recommended specifications:
```bash theme={null}
#!/bin/bash
# Usage: ./check-video.sh
FILE="$1"
# Extract video properties: codec, width, height
read -r vcodec width height <<<$(ffprobe -v error -select_streams v:0 \
-show_entries stream=codec_name,width,height \
-of default=noprint_wrappers=1:nokey=1 "$FILE")
# Extract audio properties: codec, channels
read -r acodec channels <<<$(ffprobe -v error -select_streams a:0 \
-show_entries stream=codec_name,channels \
-of default=noprint_wrappers=1:nokey=1 "$FILE")
# Flag if any property falls outside the recommended specs
needs_transcode=0
if [[ "$vcodec" != "h264" ]] || [[ "$width" -gt 2048 ]] || [[ "$height" -gt 2048 ]]; then
needs_transcode=1
fi
if [[ "$acodec" != "aac" ]] || [[ "$channels" -gt 2 ]]; then
needs_transcode=1
fi
if [[ $needs_transcode -eq 1 ]]; then
echo "This file does not meet the recommended specs and should be transcoded."
else
echo "This file meets the recommended specs."
fi
```
### Splitting Large Videos
If your video is longer than 2 hours or larger than 2 GB, split it into compliant chunks:
```bash theme={null}
# Split into 90-minute segments without re-encoding
ffmpeg -i long_video.mp4 -map 0:v:0 -map 0:a:0? -dn -c copy -f segment \
-segment_time 01:30:00 -reset_timestamps 1 \
part_%03d.mp4
```
To check duration and size before splitting:
```bash theme={null}
ffprobe -i input.mp4 -hide_banner -v error \
-show_entries format=duration,size \
-of default=noprint_wrappers=1:nokey=1
```
## Best Practices Summary
* **For quick experiments**: Use local uploads for files under 250 MB
* **For larger files**: Set up a data connector such as AWS S3
* **Before uploading**: Ensure files are 2 seconds to 2 hours duration and ≤2 GB
* **For optimal performance**: Use MP4 with H.264 video, AAC audio, ≤1080p resolution
* **For long videos**: Split into chunks using ffmpeg and track parts with metadata
* **Always check**: Use ffprobe to verify file specifications before upload
For questions about custom limits or larger file requirements, [contact our support team](mailto:support@cloudglue.dev).